
General guidelines
Mission of topic pages
Topic pages provide a rich list of solutions for Charmhub, with a range of content relevant to that subject. These pages are designed to provide an overview to a specific theme, to be a dependable source on how to make the most of our Charmhub packages, and to explore how users can deploy ecosystems. These pages can include charms, bundles, tutorials, documentation, blog posts and much more. Topic pages are also designed with ease of creation in mind, being a perfect medium to promote your favourite charms.
A good topic page should:
- Be focused on one topic or a very small group of related topics. Keep it simple and on point.
- Produce a tangible result. The topic is demonstrated with a small practical project and not only a theoretical or “hello world” example.
Content suggestions
If you need some inspiration for what information to add to your topic page, try to answer and include the following points:
- What is the topic? Why is is interesting or useful to a Charmhub user?
- Which charms and bundles are related to that topic?
- Are there any tutorials or documentation to include related to that topic?
- If someone asked you to explain that topic, what information would you tell them?
- Is there a project someone could follow to get started with that topic? What information or resources would they need?
Tone
The tone of your topic page should be friendly. Try to make the reader feel that they’re building and learning something together with you.
All topics should have the same tone, regardless of the subject. It can help to read and familiarise yourself with existing topics before writing your first one. All submitted pages will be reviewed by our friendly moderators before publishing to ensure that they are consistent in tone, relevant to the subject in question and contain no inappropriate language.
Now, let’s see the first required step!
Your topic page
Each topic page is built using at least one Discourse topic, under the category topic-pages. A topic page on Charmhub can be a single page. Optionally, it can include side navigation linking to different content pages you’d like to include in the topic. For each content page in the navigation, a new Discourse page will be needed.
Creating the navigation and cover page
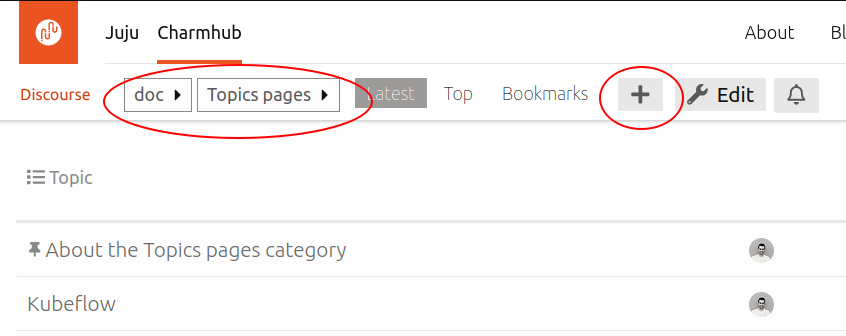
- Go to the category topic-pages in the Charmhub Discourse
- Click on the +New Topic button
- Add a title for your topic page.
- The body of this topic contains the cover page and if you want your navigation with a full list of all the pages for your topic page. Each page has to be a topic in Discourse. Here is an example snippet you can start with as an outline. Cut it from here and paste it into your Discourse topic:
The cover page of your docs. This should be some introductory text
which will be displayed on the front page of the Charmhub topic. All the content above the 'Navigation' heading below is part of the cover page.

Optionally, you can include a navigation table with other pages:

# Navigation

| Level | Path | Navlink |
| -- | -- | -- |
| 1 |  | [Overview](/t/topic-title/<ID>) |
| 1 | install | [install](/t/topic-title/<ID>) |
| 2 | Subtopic | [Subtopic](/t/topic-title/<ID>) |
| 2 | Subtopic | [Subtopic](/t/topic-title/<ID>) |
| 1 | topic | [install](/t/topic-title/<ID>) |
| 2 | Subtopic | [Subtopic](/t/topic-title/<ID>) |
If you want to see a big example, this same system is used to make the Juju.is documentation. The corresponding Discourse topic (which defines that cover page) is linked from the bottom of that page, or you can go straight there.
Let’s go through each section in detail.
Front page content
The text that is above the # Navigation section will appear on the cover page of your docs at charmhub.io/topic/<Your topic>/.
You can use formatting here to create your page, including headings, images, and lists. It is common to have an outline of the topic created, or any limitations such as requiring a particular cloud or hardware.
If you want to keep it simple, this front page can become the entire topic page, without navigation. Do not use # Navigation as a heading if you do not want to add navigation.
Using # Navigation as a heading to include navigation in your topic page is covered in the next section.
Defining the left-hand navigation structure
# Navigation

| Level | Path | Navlink |
| -- | -- | -- |
| 1 | / | [Overview](/t/topic-title/<ID>) |
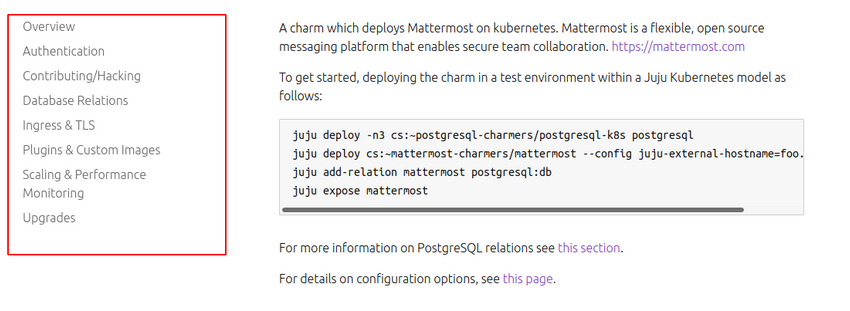
This is the navigation on the left side of the docs tab.
To add a new navigation item:
- Create a Markdown table and add a row per item
- Set a level value, you can start with 1
- Set the path for this topic
- Add a markdown link: [Title displayed on the navigation](link to any other discourse topic)
Here is an explanation of the different columns:
Level
We use this value to generate a tree structure in the navigation. Level 1 means a top-level item in the navigation.
Path
This value will be used to transform any discourse URL to a path in your Charmhub topic, as an example:
# Navigation

| Level | Path | Navlink |
| -- | -- | -- |
| 1 | about-kubeflow | [Kubeflow](/t/topic-title/123) |
Will create a path like charmhub.io/topics/about-kubeflow
Navlink
In this column, you need to specify the link to the discourse topic.
For example:
# Navigation

| Level | Path | Navlink |
| -- | -- | -- |
| 1 | install | [Install](/t/example-docs-install/9999) |
| 1 | configure | [Configure](/t/example-docs-configure/9998) |
Note that in Markdown a link is [text](url), so each of those is a link to the Discourse page. If you get this right, you can click the navigation links in your cover page # Navigation section and jump straight to the relevant Discourse topics which define those pages.
The important thing in a Discourse topic path is the number at the end, which uniquely identifies a topic, even if the title is edited later. To give an example, if the topic link is /t/foo-bar-docs/1234 and later you rename the topic to /t/fixed-up-docs/1234, then the old link to /t/foo-bar-docs/1234 will still work because 1234 never changes.
Of course, in order to have topics to link to, you need to create those topics! And we are now just creating the placeholder navigation, so leave it empty. Later you can fill it in with all the actual pages you want.
Add a new page
As mentioned in the step before, feel free to create topics in discourse for your topic page. Don’t forget to jump back into your index topic to add the correct URLs to display them in the navigation.
In these Discourse topics, you don’t need to add the navigation table since they are already handled by your index topic.
Dos and Don’ts
In addition to the previous advice on what a topic page should be and what is mandatory, you should pay special attention to the following points:
Topic pages should be concise, but not too short
Be wary of a topic’s length. Try to make the page as informative as possible.
If too long, prefer dividing the topic page
If your topic page is too long, consider breaking it up into several pieces. You can add additional items to the navigation to made your topic page easier to read.
Command line snippets
Inline commands are styled with single backticks:
For example:
`foo/something --bar`
Which renders as foo/something --bar.
For longer example code we expect people to type in, we do not use the command prompt at the beginning of each line, and we separate the command from the output. This makes the command and outputs clearer and also easier to copy and paste.
Syntax tips
The syntax used is by and large regular Markdown syntax, but there are some specificities:
Line breaks and empty lines
- Paragraphs are delimited by empty lines
- Line breaks will create a new line
In the context of an admonition or a survey widget, using an empty line will close it and go back to text.
Packages
You can display any Charmhub operator by linking the URL in a Markdown table. Example:
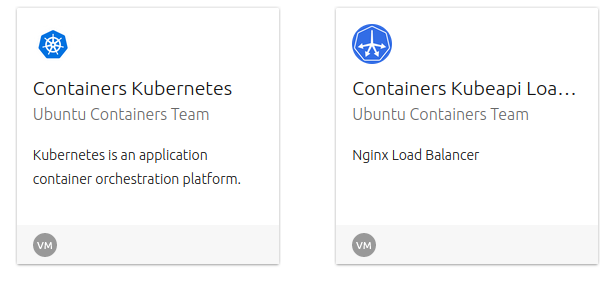
The Markdown syntax to display the previous example is the following:
| Charms |
| -- |
| https://charmhub.io/containers-kubernetes |
| https://charmhub.io/containers-kubeapi-load-balancer |
Images
Images can be hosted locally (relatively linked to the markdown source) or remotely. The engine will fetch remote images and cache them locally.
In Markdown the syntax for an image is the following:

Admonitions
Admonitions are coloured blocks that enclose special information, they can be an info tip or a warning message. To create an admonition, begin the next line with a greater than sign, a space and the message on the same line.
An info admonition should contain informative information like best practices and time-saving tips.
> ⓘ **Eat your vegetables!**
> This is a positive message.
Which renders as:
ⓘ Eat your vegetables! This is a positive message.
A warning admonition should contain an important message such as warnings and API usage restrictions.
> ⚠️ **Eat your vegetables!**
> This is a warning.
> It can be multi-lines like this.
Which renders as:
Eat your vegetables! This is a warning. It can be multi-lines like this.
Fenced code and language hints
Code blocks are declared by placing them between two lines containing three backticks. The engine will attempt to perform syntax highlighting on code blocks, but it is not always effective at guessing the language to highlight in.
Put the name of the coding language after the first fence to explicitly specify which highlighting plan to use, like this:
```go
This block is highlighted as Go source code.
```
Which renders as:
This block is highlighted as Go source code.
These additions to standard Markdown are easy to learn and play with, but in case you face unexpected behaviours in the rendering, feel free to reach out in the Discourse category charmhub-requests.
Local rendering
When writing a topic page, it’s extremely useful to see how it will render. Discourse provides a very useful way of rendering the markdown when writing a new topic. Make sure that the page is well rendered.
Once you can have seen your page in its final form, it’s time to share it with the world.
Review and publishing process
The topic pages category is managed by the Charmhub team. A review process is in place to ensure new topics are being looked at by writers, engineers and documentation experts.
To get a new topic reviewed and published, please finish your topic page in Discourse and then email: canonical-editors@canonical.com. The email should contain the following:
- Link: the desired link to the new topic page
- Summary: a description of the topic page (just 10 to 20 words) that will be displayed on the frontpage of the site.
-
Categories: suggest categories that users can use to filter to find topic pages. Use any of these preset options;
ai-ml,big-data,cloud,containers,databases,logging-tracing,monitoring,networking,security,storage.
-
Author: the name and email address between brackets of the author of the topic. If you don’t intend to maintain this topic after publication, please use
Canonical Web team <canonical-editors@canonical.com>
Once they get to it, they will review the content and open a discussion with you on the discourse topic directly. At the end of this process, they will either include your changes into the project or suggest additional changes to ensure your topic page is ready for the world to see.
Finished!
Congratulations, you made it! You are now fully equipped to write a compelling topic page and take your future readers to new heights!
Now you know how to:
- Create a welcoming and informative topic page
- Structure your markdown source file
- Render topic pages locally and submit them for publication
There are a lot of topics to write about and if you are looking for ideas, just think about what you’re proficient at and frequently do, something that’s useful to you, even if it’s an arcane topic or a very simple set of tips you think people would benefit from.
Next steps
- Write your first topic page of choice and propose it for publication!
- Read other topic pages and help us improve them by commenting on Discourse